Discussion
Loading...

Post

  • About
  • Code of conduct
  • Privacy
  • Users
  • Instances
  • About Bonfire
Tinker ☀️
@tinker@infosec.exchange  ·  activity timestamp 6 months ago

Oh shit. Gonna build a lettuce wall.

Can't stop. Won't stop.

Design Goals
- Low effort / passive / automated (After initial build, only requires 30 mins of work a week to maintain)
- "Inexpensive" (measured in how quickly it pays for itself compared to shopping at grocery store)
- Small footprint for indoor spaces (uses vertical space as opposed to horizontal space)
- ADHD friendly (you dont have to keep monitoring it. Set and forget)
- Provides entire personal need of leafy greens in continuous fashion
- Provides excess of personal needs in order to continuously share freely with neighbors

(Follow this thread in the coming months to watch the buildout. I'll post design theory and application along. It'll be vendor/brand agnostic. And I'll post up methods to tailor it to your space.)

(Photo below of prototype. It works! Time to scale it.)

#solarPunk #indoorGardening #verticalFarming #hydroponics #kratky #kratkyMethod #vegetableGardening #gardening #postScarcity #foodSecurity

Photo of leaf shelf with three bins hosting 15 plants. 5 each of butterhead, goldrush, and arugula). The heads of lettuce fill the space and fall over the sides of the bins showing bounty.
  • Copy link
  • Flag this post
  • Block
Tinker ☀️
@tinker@infosec.exchange replied  ·  activity timestamp 6 months ago

The Kratky Hydroponic Lettuce Wall will be comprised of a couple of things:

1) A utility shelf with adjustable shelving
2) Full spectrum LED "grow" light strips w/ timer
3) Grow bins

That's it.

The utility shelf can be broken down into the following requirements:
- DANGER!!! WARNING!!! IMPORTANT!!!: The shelves should be able to actually hold the weight of your grow bins. Water is heavy. Many shelves by themselves cannot support the weight of the water and will need support. So check the weight rating on the shelves you get. We'll continue to talk about this further as we built out the shelf.
- ANOTHER DANGER!!! WARNING!!! IMPORTANT!!!: You need a way to anchor your shelves to the wall SECURELY!!! You don't want this thing tipping over. You build it too high and it falls on your kid or dog or cat and they may die. Secure this to your wall. Especially the higher you build it.
- Shelves need to be adjustable to allow enough space for the bin to sit and for the plant to grow
- A way to attach the light strips to the shelf above the grow bin
- Bonus: Make it pretty

The Grow Light Strips can be broken into the following requirements:
- They should fit the length of the shelf you pick and be attachable to it in some way
- You should be able to control them with a timer (either on the light itself or set up with a wall socket timer
- Have a method of increasing the light or decreasing the light (easily add more light strips if needed, or adjust brightness, etc)
- Be full spectrum "grow" light. Note: it does not have to SAY grow light. Sometimes lights are like cakes. A regular white cake is cheap. Add the name "Wedding" to that same cake and it gets expensive. As long as the LED light strip generates enough light for a plant to eat, we're good.

The grow bins can be broken down into the following requirements:
- They should hold water.
- They should be fully opaque and not allow any light into the bin itself.
- They should hold some sort of grow medium to allow a plant to grow on top and provide access to the roots to get into the bin to access the nutrient water
- Bonus: Make them pretty

That's it.

No pumps.
No aerators.
No central reservoir.

Just a place to put a kratky bin and grow lettuce.

We'll tackle how to size and shop for a utility shelf next.

#solarPunk
#indoorGardening
#verticalFarming
#hydroponics
#kratky
#kratkyMethod
#vegetableGardening
#gardening
#postScarcity
#foodSecurity
  • Copy link
  • Flag this comment
  • Block
Tinker ☀️
@tinker@infosec.exchange replied  ·  activity timestamp 6 months ago

Alright, let's size out a shelf for us.

Quick centering moment...

This does not and SHOULD NOT be perfect.

Don't worry about maximizing space. Don't worry about making it perfect. Don't worry about being precise. If you're really worried, start small and get a feel for it, then make something bigger the next go around.

Also, don't follow my instructions perfectly. I'm building for my space. But you build for your space. Make it cozy. Make it yours. Make it different. Or do exactly as I do and enjoy it, I don't care, it's your's! lol!

We're putting together a place to hold a bucket of water. It need not be complicated or stressful.

Okay!!! LETS DIVE IN!!! YAY!!!

A couple things to keep in mind while we're choosing a shelving system (system used LOOSELY here):
- How much *floor* space do you have. Whats a good-ish footprint. Width and Depth.
- How tall are your walls / how high up the wall you want to build. Height.
- How much space you want between your shelves. Space for the grow bin and space for the plant to grow above it.
- (IMPORTANT!!!) Ensuring it can handle the weight of all the bins filled with water.
- With that, ensure it can handle getting wet. This should be a utility shelf.

So we're growing in doors. You have limited space.

If you have virtually NO space. Then you can do a single-unit grow bin with a footprint of 6 inches by 6 inches, right? You can find a link to that build in my bio page. But if you have a couple of feet, you can build a shelf.

I like to grow out of 5 gallon plastic (it says its food safe... I dunno...) storage containers. Think the 5 gallon "Commander" storage containers found at various chain hardware stores. The dimensions for these are 16.4" x 12.3" x 8.6". I can fit three of these side by side in a roughly 3ft wide shelf. There are many other options, but consider what you want to grow out in a roughly 3ft by 2ft footprint shelf, right? You pick your grow bins, plastic, glass, metal - but we'll use these bins as the example moving forward.

Ok. That's my footprint. Roughly 3ft wide. 2ish ft in depth. That's what I want any given shelf footprint to roughly measure.

Looking around my house. I have a section of floor space that I can push my clean clothes pile out of the way and make room for 3x2 shelf. Heck. In a corner, I can put a 3x2 shelf facing one direction and squeeze another 3x2 shelf against the other wall and it makes a 5x3 L shape thingy... Cool. I'm doing that. Gonna put my lettuce wall in the corner.

My height is roughly 9ft.... holy shit, that's a tall ceiling. Okay... Anyhow, you sort out how tall your ceiling is. You don't have to build all the way up, right. You can build out along your wall if you want more shelving. But that gives you the max amount you can play with.

Now here's the big thing. You're going to want adjustable shelving. That's key. That lets you set up the distance between shelves to tailor it to your grow bins and plants.

I've found two options (let me know if you find more!):
1) Adjustable Wireframe Utility Shelves
2) Adjustable Wooden Storage Shelves

Frankly, the wireframe utility shelves are your best option. They are generally affordable. They are adjustable. You can attach all sorts of things to it with zip ties and the like (good for setting up your lights). They can hold a LOT of weight.... this is awesome. And the BIGGEST THING!!! While they are generally affordable when bought new, more importantly you can often find these used for cheap or even free via craigslist, facebook marketplace, or dumpster diving. They hold up for a long time and people give these away all the time. Go snag some for free.

But! I live with someone else. And they have veto'd it for the lettuce wall. They're cool with a wireframe shelf in a utility closet or garage, but not next to where we are eating. But they bring about an important point. They associate wireframe utility shelves with work (they were a baker several years ago). And that specifically looks too utilitarian to them. They want more wood and nature in their lives. So! I'm going with the second option.

The adjustable wooden storage shelves.

I can stain them. I can paint them. I can make them really pretty. ( I pointed out that I could make the wireframe pretty too!!! And you can!!! But I don't have personal negative vibes associated with wireframe... I must compromise! And I do so gladly and easily. 😜 )

Real quick aside and to that point... Aesthetics are REALLY important. You absolutely must make these things look pretty. And you can do so very simply and without a lot of cost. Decorate the shit out these shelves. Whether you're going for hygge, or solarpunk, or cottagecore, or for psychedelic jackson pollock splatterpaint. Make it pretty for you and your's. I'm tired of minimalism... no more millenial beige. You can do that.. I don't mind. But make it to where when you look at this shelf, you smile and your heart lifts and you breathe easier. Make your space a place of beauty.

Ok, back to shelves... The one bad thing that I've found for a lot of the adjustable wooden shelves though, is they CAN NOT hold a lot of weight. Like... the one I'm looking at right now, the shelves sit on little pegs that sit in a hole in the side wood. That's shit. Absolute shit. A little bit of water weight and those pegs will pop right out and down goes the shelving.

So, I'll have to buy some metal brackets to hold these shelves up. The wood of the shelf is good wood (not particle board that can separate if it gets wet) and it can hold weight. The side beams can hold weight. Wood is good in compression. Its just the joints that suck. Alright, cool. I'll use the pegs to get the selves in the right place and then I'll bracket them down.

For me, I'm going to go with the Ikea Ivar special: (not an ad). It's what I have used on my current kitchen garden shelf. And I've liked it so far.

Lastly, how many shelf sections (the flat space to hold your bins) do you need? This depends on how high you make the shelf and how much separation you want between your shelves.

For me, with my specific grow bins, I need around 1ft 10ish inches. That leaves enough room for the height of my bins. The height of the plants I'm growing here. And a little space for my LED grow light strips. With that and my room height, I can get 5 shelves in with the top shelf holding a grow bin and me attaching grow lights to my ceiling. I think my math maths... check me if I'm wrong...

Alright! So here are the dimensions for my shelving system. This is for me. Your's will be different. I'm getting two setups with five shelves each:
Height: 89inches
Width: 35inch (shelves are 33 inches themselves)
Depth: 20inches

I'll need to buy some simple brackets for the back. I'm going to buy some pretty brackets for the front. And some stain for futher prettiness.

That gives me five rows of six bins that grow five plants each.

So that's 150 heads of various leafy greens.

If I stagger it out with a new growth every week and if these plants mature at six weeks (first growth - four weeks second and maybe third growth), that means I can get a first growth of 25 plants each week on a continuing rotating schedule!

I can't eat all that lettuce and leafy greens.

I'm going to HAVE to give away a lot to my neighbors for free.

#solarPunk #indoorGardening #verticalFarming #hydroponics #kratky #kratkyMethod #vegetableGardening #gardening #postScarcity #foodSecurity
  • Copy link
  • Flag this comment
  • Block
Tinker ☀️
@tinker@infosec.exchange replied  ·  activity timestamp 6 months ago

Lettuce Wall Thread

Materials purchased!

I splurged on making it pretty with decorative shelf brackets. Just means it'll take a couple more crops to pay for itself.

Next up will be staining and assembling.

#solarPunk #hydroponics #indoorGardening #verticalFarming #vegetableGardening #postScarcity $foodSecurity

A picture of bare wood shelving. The side panels look like ladders and go up just past eight feet. The wood shelves themselves are stacked against the wall. The wood is untreated and unstained.
  • Copy link
  • Flag this comment
  • Block
Tinker ☀️
@tinker@infosec.exchange replied  ·  activity timestamp 2 months ago

Lettuce Wall Thread

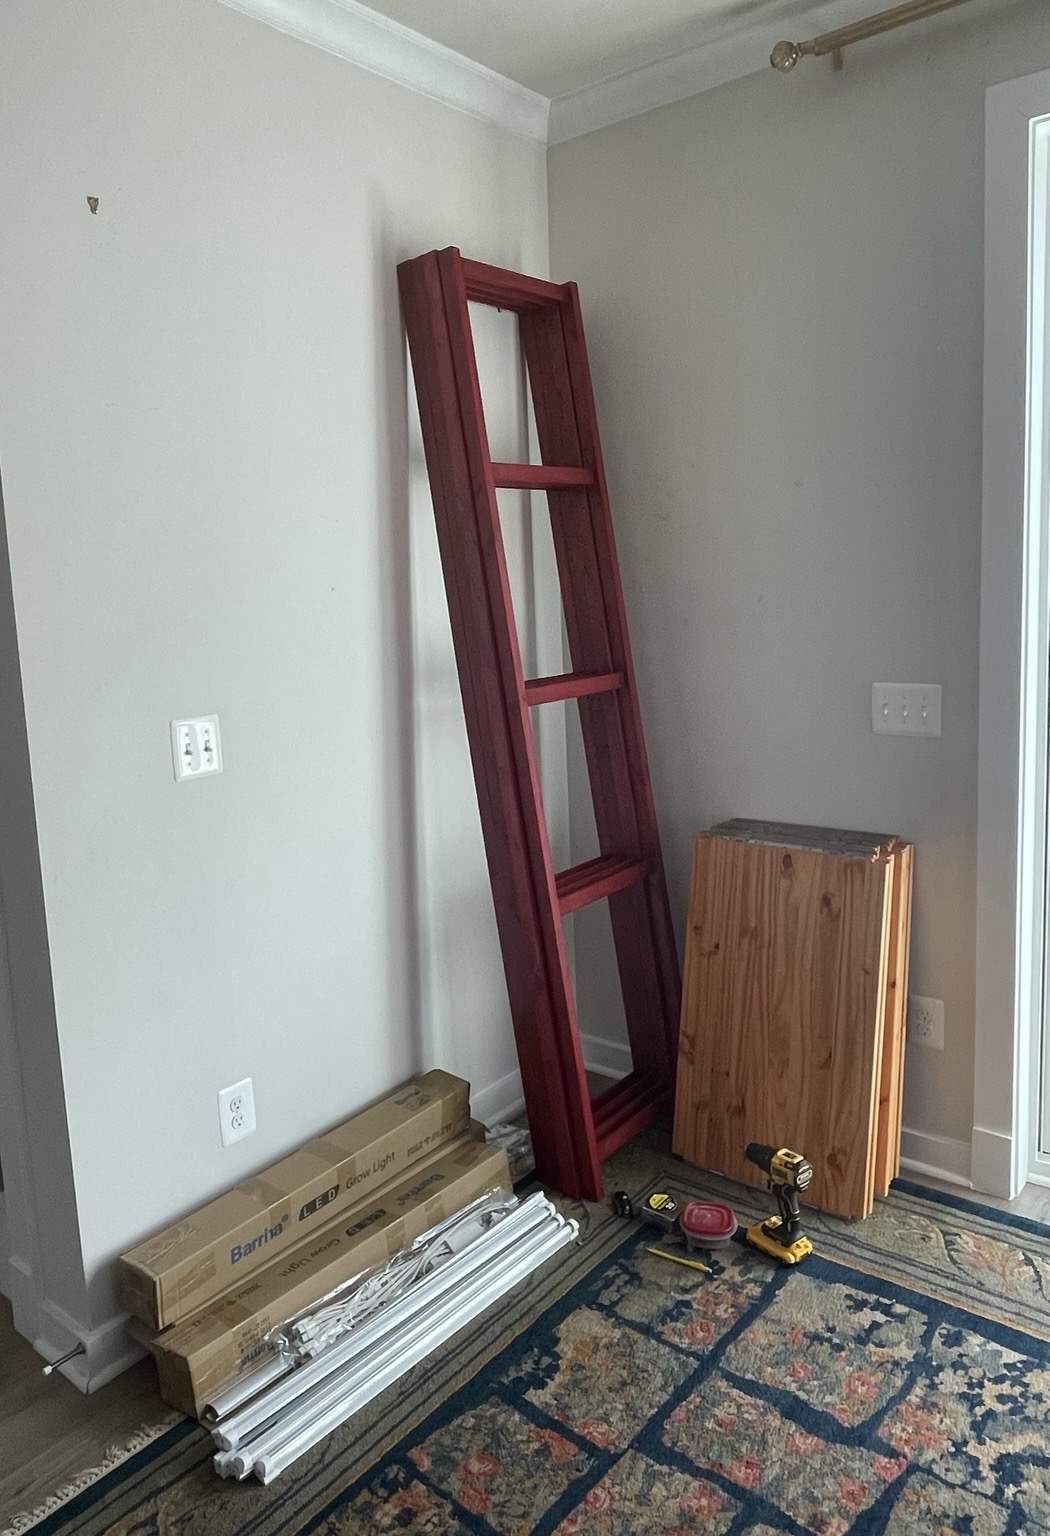
Wood is stained and ready to assemble!

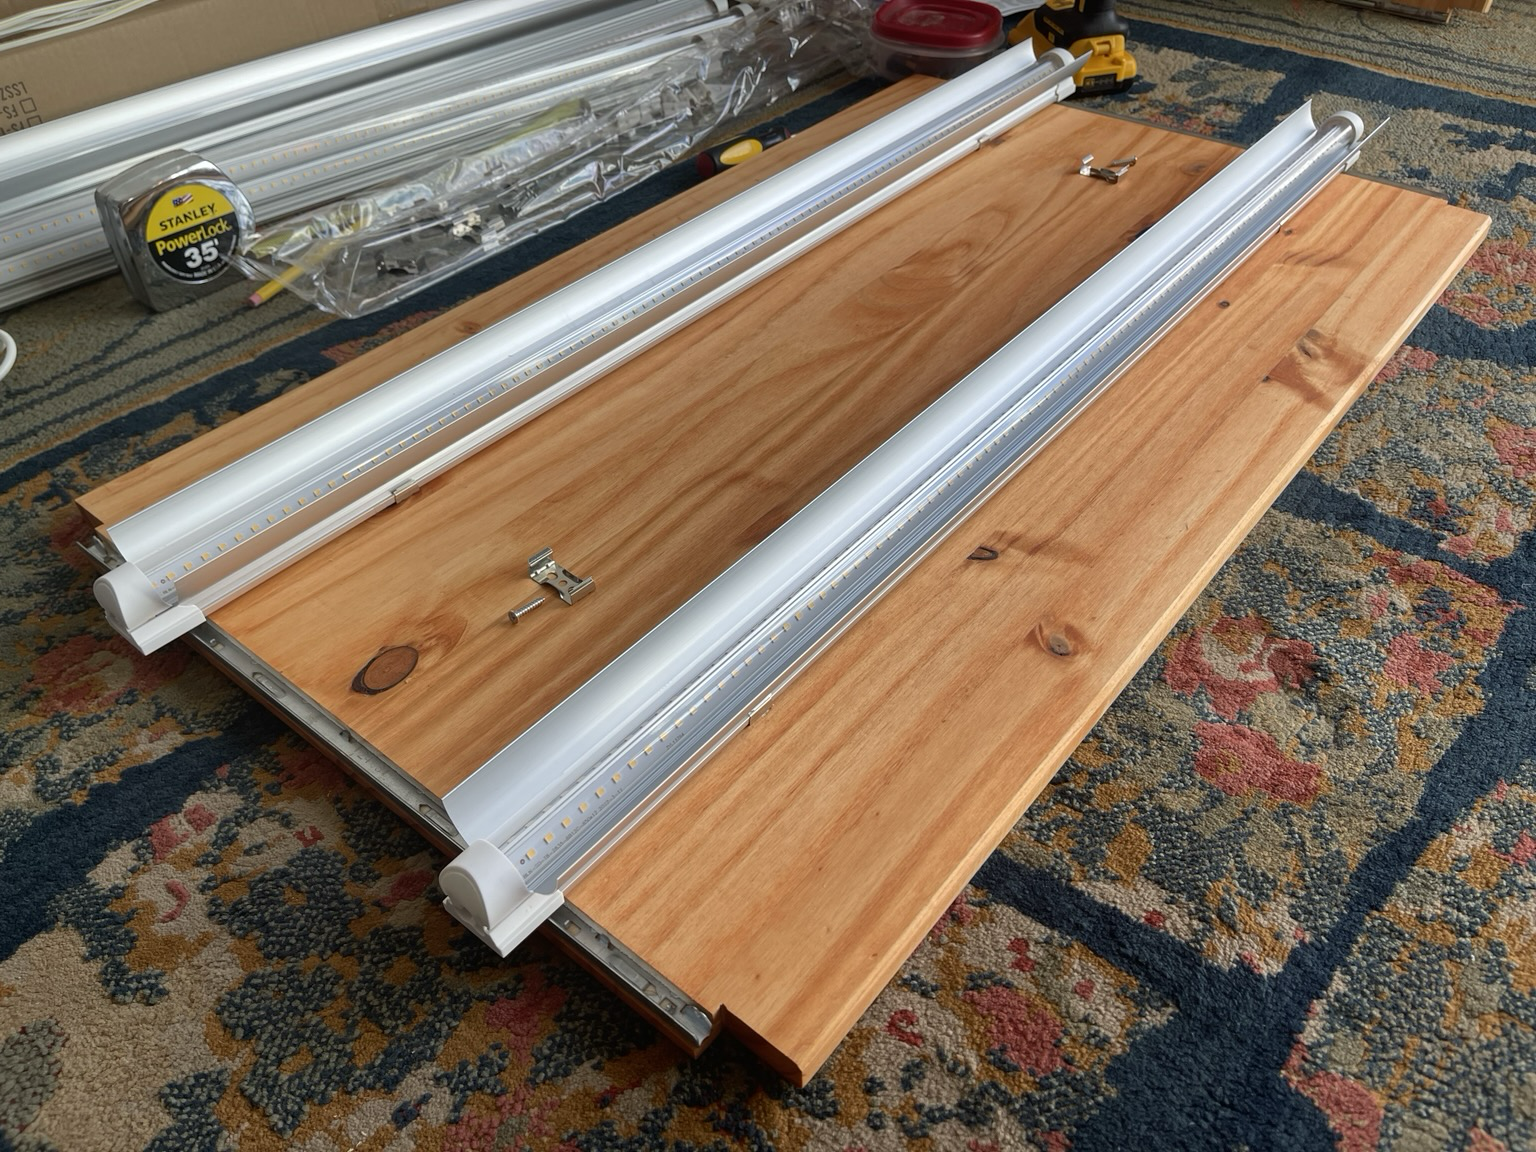
I've started to mount the T8 LED Grow Light strips. I'm putting two T8s on each shelf. I have left space to put a single T5 or T8 in the middle in the future if I need more light. But two T8s should be plenty.

(Note how long its been since my last update. It takes me a while to complete projects for a variety of reasons. I still work on them though even if they take a while. I complete as much as I'm able at any given time knowing that when I'm able to work on it in the future, I will. I have no set schedule and I am forgiving and easy on myself. It will get done. In its own time.)

#solarPunk #hydroponics #indoorGardening #verticalFarming #vegetableGardening #postScarcity #foodSecurity

The underside of a shelf with two T8 LED Grow Light strips attached via metal brackets screwed into the wood.
The stained food side rails and shelves are shown stacked against the wall. The side rails are stained a rich full red. The shelves are stained a reddish wooden cherry-wood color.
  • Copy link
  • Flag this comment
  • Block
Log in

bonfire.cafe

A space for Bonfire maintainers and contributors to communicate

bonfire.cafe: About · Code of conduct · Privacy · Users · Instances
Bonfire social · 1.0.0-rc.3.21 no JS en
Automatic federation enabled
  • Explore
  • About
  • Members
  • Code of Conduct
Home
Login